1 Starting with Access
- Understand what databases are and how they are structured.
- Get a brief introduction to database components (tables, queries, forms, reports, macros, modules).
- Learn how to start and close Access.
- Open an existing database and save it under a different name and/or file format.
- Get familiar with the layout of the Access program window.
Access is part of the Microsoft Office suite and allows you to create and manage databases. With databases, you can store, organize, and analyze data efficiently.
Data may include details such as customer information, orders, products, suppliers, and more. This data is stored in a structured way, enabling you to answer questions like:
- What was the revenue per customer over the past six months?
- Which products account for the majority of sales?
Access is often considered the most complex application in the Microsoft Office suite. This is primarily due to how databases are structured and function. Unlike Excel, PowerPoint, or Word, where you can start entering data right away, Access requires you to design and create a database structure before adding any data. For large or complex databases, this is typically done by database professionals.
1.1 What Are Databases?
A brief overview of what databases are and how they are organized.
A database is a collection of data related to a specific topic or purpose. It allows you to store and manage information from various sources, such as:
- Customer addresses in an address list
- Supplier phone numbers in a directory
- Product data in a filing system
- Customer orders in a folder
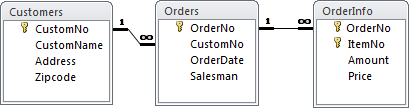
This information is usually stored in separate tables that make up the database. In its simplest form, a database may consist of just one table. However, tables can be related to one another, allowing you to link data across tables. Such a setup is known as a relational database.
In addition to creating and managing tables, you can build forms, queries, and reports. Forms make data entry more efficient. Queries allow you to retrieve specific information. Reports help present your results in a clear and readable format for screen or print.
A database in Access can contain the following components (also called objects):
- Tables
- Queries
- Forms
- Reports
- Macros
- Modules
Access stores all of these components in a single file.
There are two main tasks when working with databases:
Designing the database – This includes creating the structure: tables, queries, forms, and reports. Once completed, this task is usually done.
Working with data – Entering, updating, querying, reporting, and managing the data. This is an ongoing task.
1.1.1 Tables
Data in Access is stored in tables. Each table usually represents a specific type of data. For example, a Products table might store product details, while a Suppliers table contains information about companies that provide those products. Determining which tables you need—and how they relate—requires careful planning and structure. Database designers often follow a process called normalization to ensure efficiency and avoid redundancy.
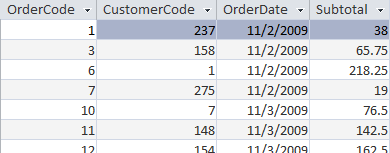
Data in a table is organized into columns (fields) and rows (records).

- Field
-
A field is a data category, such as company name, contact person, phone number, or unit price. Each column in a table is a field.
- Record
-
A record is a complete set of data for a single item—such as a product, person, or company. Each row in a table is a record.
1.1.2 Queries
A query is used to retrieve specific data from one or more tables. It’s like asking the database a question, such as “Which products have a supplier located in Australia?” The data used to answer this question may come from multiple tables. The query gathers and displays the relevant records, also known as a dynaset.
When creating a query, you define the information you want to extract. You can also set conditions to filter the data. For example, you might create a query to view order details from a certain time period. Queries can also perform calculations, such as totals or averages.
Another type of query is an action query, which modifies the selected records.
1.1.3 Forms
While tables are great for viewing multiple records at once, forms are better suited for displaying individual records or presenting data in a customized layout.
Forms provide a user-friendly way to enter, update, and view records. When designing a form, you decide how the data should appear. When you open the form, Access retrieves and displays the data based on your design. Forms can pull data from multiple tables and include macros or modules for automation.
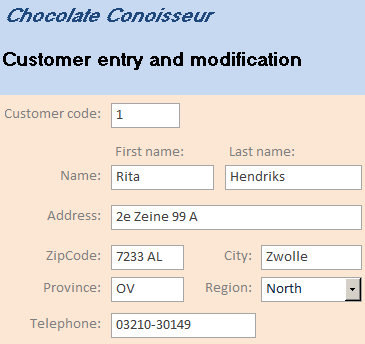
Forms can include features like dropdown lists, color-coded highlights, validation messages, automatic calculations, and more. You can also switch between form view and datasheet view (a table-like layout) with a single click.
1.1.4 Reports
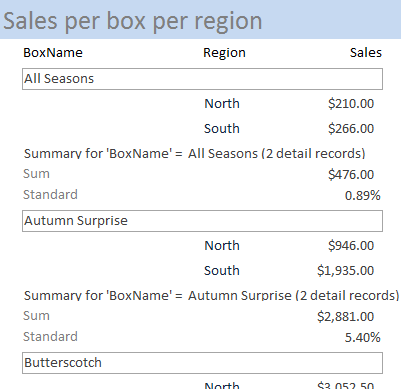
Reports are used to present data clearly on screen or paper, often including subtotals or grand totals across groups of records.
The elements in a form or report that display data are called controls. These can show field values, calculations, charts, and more. Reports can also be used to create labels.
Controls are elements on forms or reports that display or print data. Examples include buttons, list boxes, and check boxes.
They allow you to show field values, calculations, titles, messages, charts, or even other forms or reports.
1.1.5 Macros
A macro is a set of one or more actions, such as opening a form or printing a report. Macros help you automate routine tasks and can be attached to forms, reports, controls, keyboard shortcuts, or menus. You don’t need programming skills to create them.
1.1.6 Modules
Modules contain code written in Visual Basic for Applications (VBA), the programming language built into Access. Modules let you automate complex or custom tasks. Creating VBA modules does require some programming experience.
1.2 Starting and Closing Access
How you start Access depends on how it’s installed. This course assumes a default installation of Microsoft 365 in English on a Windows 10 English system. On most computers, you can start Access via the Windows Start button:
Task 1.1
- Choose Start > Access.
The Access start screen appears. On the left (under Recent), you’ll see your most recently opened files. On the right, you can choose from templates to create new databases.
- To close Access, click the X button in the upper-right corner of the window.
Unlike many other programs, Access automatically saves all changes. You don’t need to manually save your database.
1.3 Opening a Database
You can open an existing database in several ways:
- Double-click the Access file in Windows Explorer.
- In Access’s start screen, click a recent file or choose Open Other Files.
- If Access is already open, choose File > Open.
Task 1.2 File: candy365.accdb
Use one of the methods above to open the database.
When you open a database, Access loads all its components (tables, queries, forms, reports, macros, modules) into memory. This allows you to work with the data and design elements efficiently.
To close the current database but keep Access open, choose File > Close.
1.4 The Access Interface
The Access window includes several main parts from top to bottom: program controls, document area, and the status bar.
- File
-
The File tab in the top-left corner provides common options like opening, saving, printing, and customizing Access through Options.
- Quick Access Toolbar
-
This customizable toolbar contains shortcuts for frequently used actions. By default, it includes:
-
 - Save
-
 - Undo
-
 - Redo
- Ribbon
-
A panel at the top with organized commands grouped under tabs such as Home or Create. Some contextual tabs appear only when needed (e.g., the Table tab appears when a table is open). Frequently used commands are on the left; specialized ones are on the right.
You can’t remove the ribbon, but you can minimize it using CTRL + F1. Pressing it again restores the ribbon.
- Tabs
-
Tabs appear at the top of the ribbon, grouping related commands. Some tabs only appear contextually.
- Groups
-
Commands are grouped logically within each tab. To view more options, click the small arrow
 in the bottom-right corner of a group.
 - Command button
-
Clicking a button usually applies an action immediately or opens a dialog box or drop-down menu.
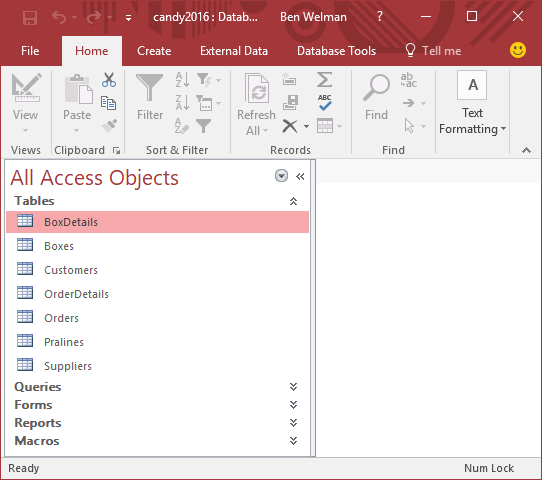
- Navigation Pane
-
Located on the left, this pane lists all database objects.
- Document window
-
When you open an object, it appears in a separate tabbed document window.
1.5 Creating a New Database
Before creating a new database, you should first perform an information analysis and design its structure—typically using normalization. Once that’s complete, building the database is relatively straightforward. While this course doesn’t cover database creation in detail, here are some general steps:
From the Access start screen:
- Click Blank database to start with an empty database.
- Specify the file name and location.
- Access creates the new database with an empty table. (Table creation is discussed later.)
You can also use one of Access’s many templates. These templates include predefined tables, queries, forms, and reports, which you can customize as needed—this can save time over starting from scratch.
1.6 Saving a Database As…
You might want to save your database under a different name or file format. Use Save As to do so.
This course uses a sample database named candy365.accdb. Since Access saves changes automatically, your original copy would quickly be altered. To avoid losing the original, create a working copy before making changes—either using Windows File Explorer or the Save As command.
Task 1.3 File: candy365.accdb
Open the database.
Choose File > Save As.

Select Access Database (*.accdb) and click Save As.
Choose a location, enter a new file name, and click Save.
1.6.1 Backup
A backup is simply a copy of your database at a given point in time. Though you can use Save As, Access also offers a built-in Backup feature:
Choose File > Save As, select Back Up Database, and click Save As. You’ll be prompted to choose a location and file name. By default, Access adds the current date to the original file name.
When restoring from a backup, it helps to know which database it came from and when it was created. Using the default file name is a good practice.
1.7 Access File Formats
A summary of Access file formats:
- ACCDB
-
The default format for Access 2007 and newer (2010, 2013, 2016, 2019, 365). Files are compatible across versions, but newer features may not work in older versions.
- MDB
-
The format used by Access 2003 and earlier. Access 2007 and later can open and save MDB files, but newer features are not supported.