2 Exploring Candy database
- Understand the sample database
candy365.accdb. - Learn how to handle security alerts.
- Explore the windows and navigation options within Access.
- Discover the display capabilities of tables, forms, reports, and queries.
- See how a command button works on a form.
- Learn how to search, sort, and filter records.
- Print tables, queries, forms, and reports.
This course is centered around the sample file candy365.accdb. This chapter explains the design and use of the tables in the database. You will experiment with this sample database to discover different aspects of working with Access. Some features are explored further in other chapters.
2.1 Example Database Candy
The example database candy365.accdb contains data from the company SNOOPY, which sells boxes of pralines to customers. Each box contains different types of pralines. The information is stored in six tables:
- Customers
- Orders
- OrderDetails
- Boxes
- BoxDetails
- Pralines
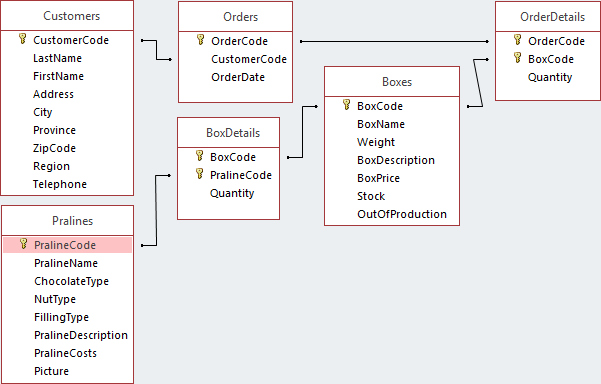
Customer data is stored in the Customers table. Customer orders are recorded in the Orders and OrderDetails tables. Information about each box of pralines, such as name and price, is stored in the Boxes table. The BoxDetails table shows which pralines and how many of each are in each box. The Pralines table contains details about each praline, including its name, chocolate type, filling, and even a picture.
Each table should include a column or set of columns that uniquely identifies each row. This is often a unique identification number, such as an article number or employee number. In database terminology, this is called the primary key of the table. The value of the primary key must be unique in the table; duplicate values are not allowed. Most tables have a primary key consisting of a single field, but sometimes a combination of fields is needed to ensure uniqueness.
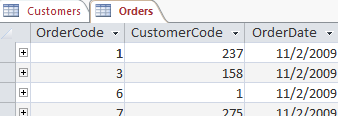
In the Customers, Orders, Boxes, and Pralines tables, the key is a single field. In the OrderDetails and BoxDetails tables, two fields are required for the key. See Figure 2.1.
The six tables are briefly discussed below.
2.1.1 Table Customers

The Customers table stores various details about each customer. Every customer has a unique customer code. The CustomerCode field is the primary key of the table. Each row in a table is called a record. Customers are sorted by the primary key.
Check that there are 325 customers in the Customers table.
2.1.2 Table Orders
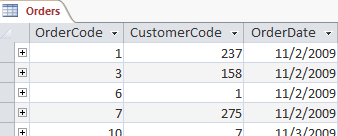
In the Orders table, OrderCode is the primary key, and its value is unique. A specific CustomerCode can appear more than once in this table because a customer can place multiple orders. Each order is always associated with one customer.
Check that there are 784 orders in the Orders table.
2.1.3 Table OrderDetails
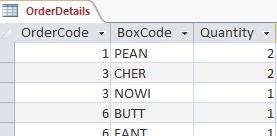
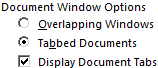
An order can contain multiple boxes, but each BoxCode can only appear once per order. However, a particular box can be ordered in multiple orders, so a BoxCode can be linked to multiple OrderCode values. The OrderDetails table has 1,537 records (order rows).
Check that two different boxes were ordered in the order with order code 3, as the table contains two rows with order code 3. A total of three boxes were ordered in this order: two boxes with box code CHER and one box with box code NOWI.
The combination of OrderCode and BoxCode is always unique. Therefore, the key in this table is a combination of these two fields.
The total number of boxes ordered across all orders is the sum of all values in the Quantity column. This number is not present in the table. Another chapter in this course will explain how to calculate it.
2.1.4 Table Boxes
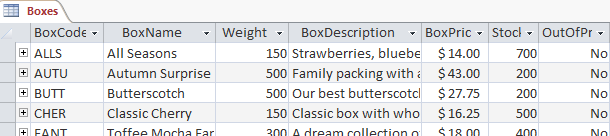
In the Boxes table, BoxCode is the key. There are 18 different boxes, each with a unique BoxCode. This table serves as the Snoopy company’s product list.
2.1.5 Table BoxDetails
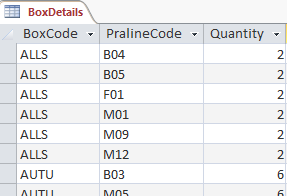
The BoxDetails table stores which types of pralines and how many of each are in a specific box. For example, you can see that box ALLS contains six types of pralines, two of each, for a total of twelve pralines. In this table, the key is a combination of BoxCode and PralineCode. The table has 84 records.
2.1.6 Table Pralines

The Pralines table stores properties of each type of praline. The key is the PralineCode field. The table contains 41 records (praline types).
You can easily perform some calculations based on the data from these tables.
What is the average number of praline types per box?
Divide the total number of records in the BoxDetails table by the total number of box types: \(\frac{84}{18}= 4.7\).What is the average number of box types per order?
Divide the total number of order rows by the total number of orders: \(\frac{1537}{784} = 2.0\).
You can’t easily calculate the average number of pralines in a box. To do this, you need the total number of pralines in all boxes, which is the sum of all values in the Quantity column in the BoxDetails table.
2.2 Security and Macros
How to handle security warnings when opening a database.
Some databases, such as candy365.accdb, contain macros. In most cases, these macros are designed to perform specific tasks in the database. However, virus writers can use macros to spread malware. When a database is not in a trusted location or signed by a trusted publisher, Access displays a security warning when opening the database, and macros are disabled.

You can enable macros in one of the following ways.
Enable Macros Temporarily
Click the Enable Content button in the area with the security alert.
This method is not recommended because you will have to enable macros every time you open the database and see this warning.
Add Publisher to Trusted Publishers List
If the database creator has provided a digital certificate, you can add the creator to the Trusted Publishers list. Access will automatically enable all macros created by this publisher in all databases. This is a very secure method, but usually only larger companies use digital certificates. The database candy365.accdb does not have a digital certificate.
Move Database to a Trusted Location
Access provides trusted locations (folders). Macros in databases stored in a trusted location are automatically enabled. This is the most convenient and recommended way to work safely without interruptions from security alerts for the database candy365.accdb. To do this:
Go to File > Options > Trust Center > Trust Center Settings… > Trusted Locations > Add new location….
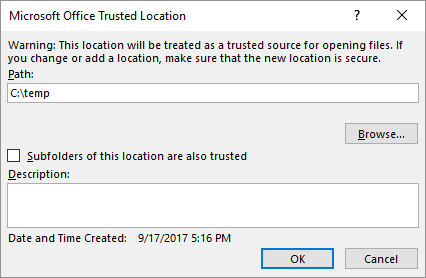
In this example, the folder C:\temp is added as a trusted location.
Security Settings for All Macros
Optionally, you can change how Access handles all macros in all databases:
Go to File > Options > Trust Center > Trust Center Settings… > Macro Settings
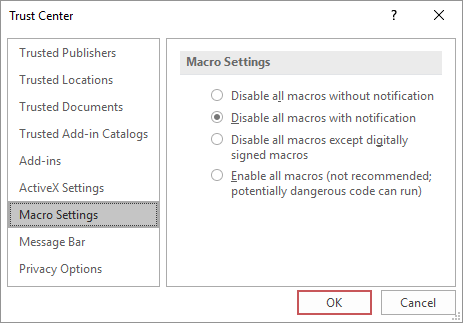
It is not recommended to enable all macros, as this removes important security controls.
2.3 Exploring the Database
To explore, you must have the database candy365.accdb open.
If a security warning is displayed, you should take action as described in Section 2.2.
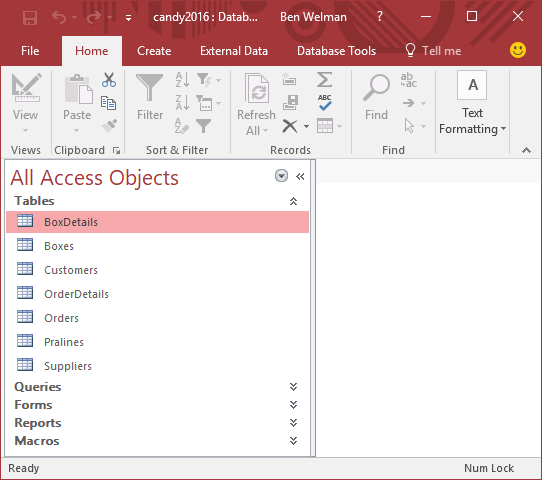
The Navigation Pane is on the left side and contains all objects in the database. Objects are divided into groups: Tables, Queries, Forms, Reports, Macros. In the example, the Tables group is expanded. The navigation pane and its groups can be expanded or collapsed.
 - select which objects are shown
 - expand a group pane
 - collapse a group pane
 - collapse the navigation pane
 - expand the navigation pane
Double-clicking an object in the Navigation Pane opens it and displays its contents in a document window. If you open several objects, they are displayed as tabbed documents.
You can change this setting through File > Options > Current Database. In Figure 2.13, you can see the available document window options.
If you select Overlapping Windows, objects are displayed in separate windows, overlapping each other.
If you need more horizontal space, you can collapse the navigation pane. If you need more vertical space, you can hide the ribbon by double-clicking a ribbon tab. Double-clicking again will show the ribbon.
2.4 Exploring Tables
Tables are the key components of a database, as all data is stored here.
The two most important views of a table are:
- Datasheet View
-
In this view, you can see and edit the contents of records, and add new records.
- Design View
-
In this view, you can see and modify the design of the table.
Task 2.1 File: candy365.accdb
Open the database.
Open the Customers table. The table opens in Datasheet View.
Switch the Customers table to Design View in one of the following ways:
- Click the Design View button in the bottom right of the program window

- Choose Home tab > View (Views group) > Design View
- Right-click the table name in the navigation pane and choose Design View from the shortcut menu.
- Click the Design View button in the bottom right of the program window
Switch the Customers table back to Datasheet View in one of the following ways:
- Click the Datasheet View button in the bottom right of the program window

- Choose Home tab > View (Views group) > Datasheet View
- Right-click the table name in the navigation pane and choose Open
- Click the Datasheet View button in the bottom right of the program window
Close the Customers table using the Close button X at the top right of the document window.
Open the Orders table in Datasheet View.
In the Orders table, there is an expand button + in front of the records. Clicking it shows the order details, which come from the OrderDetails table. The associated details can be found because both tables contain the OrderCode field.
- Click the expand button on a few records to see which boxes and how many were ordered.
- Close the Orders table.
2.5 Exploring Forms
Forms are especially important for displaying, adding, and editing data.
The main views of a form are:
- Form View
-
In this view, information is displayed, and you can edit or enter new data.
- Datasheet View
-
A view similar to that of the table.
- Design View
-
In this view, you can see and modify the design of the form.
Task 2.2 File: candy365.accdb
Open the database.
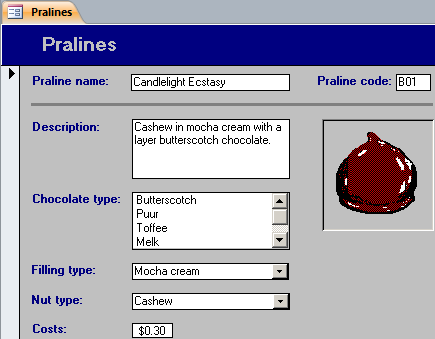
Open the Pralines form. The form opens in Form View.
Switch the Pralines form to Design View in one of the following ways:
- Click the Design View button in the bottom right of the program window .
- Choose Home tab > View (Views group) > Design View
- Right-click the form name in the navigation pane and choose Design View from the shortcut menu.
- Click the Design View button in the bottom right of the program window
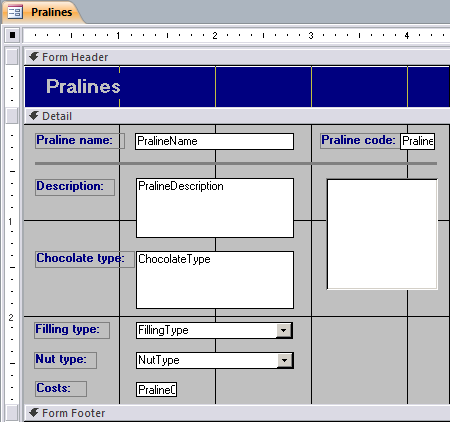
In Design View, you can change the layout of the form and add controls such as text boxes, labels, list boxes, checkboxes, and more.
Switch the Pralines form back to Form View using
 .
.Browse through the records using the navigation buttons at the bottom left of the document window.
 - First record
 - Previous record
 - Next record
 - Last record
 - New (empty) record
Close the form.
2.7 Searching for a Record
A form can also be used to search for a record. In the following steps, you will search for a box with “autumn” in its name.
Task 2.4 File: candy365.accdb
Open the database.
Open the Boxes form.
Click in the Box name field and, on the ribbon, choose Home tab >
 Find (Find group). The Find and Replace dialog box appears.
Type “autumn” in the Find What text box and select Any Part of Field in the Match box.
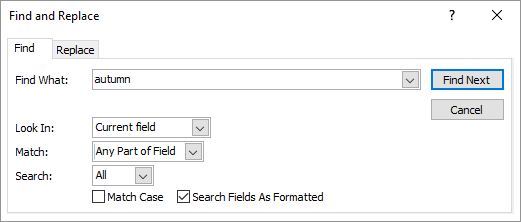
Click Find Next. The content for the box “Autumn Surprise” is displayed.
Click Cancel to close the search window.
Close the form.
2.8 Exploring Queries
Queries are important for selecting or summarizing data from tables. A query is a specific question to the database to retrieve certain information.
The two most important views of a query are:
- Datasheet View
-
In this view, you can see the result (data) of the query.
- Design View
-
In this view, you can see and modify the design of the query.
Task 2.5 File: candy365.accdb
Open the database.
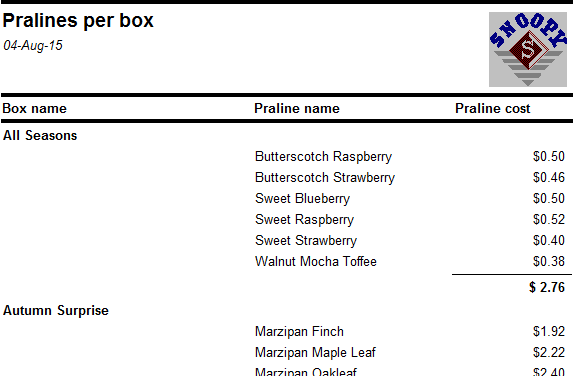
Open the Pralines per box query.
Access executes the query and displays a datasheet with the results, as shown in Figure 2.18.
The results of this query are derived from multiple tables. To see which tables are used, switch to the query’s Design View.
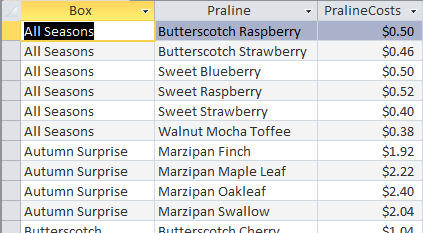
Switch the Pralines per box query to Design View in one of the following ways:
- Click the Design View button in the bottom right of the program window .
- Choose tab Home > View (group Views) > Design View.
- Right-click the query name in the navigation pane and choose Design View from the shortcut menu.
- Click the Design View button in the bottom right of the program window
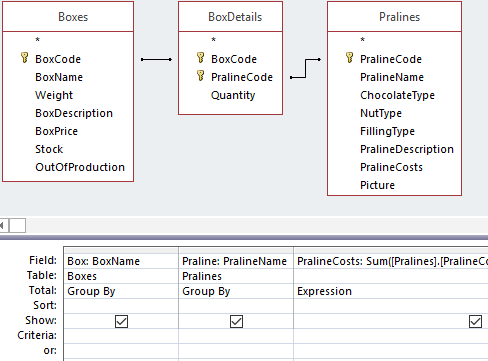
The upper three rectangles represent the tables used in this query. The lines with arrows connect the field names by which the tables are related.
In the lower part of this window, the first row contains the names of the fields used. In the third column is an expression, a formula that performs operations on the fields. The expression here is Sum([Pralines].[PralineCosts]*[BoxDetails].[Quantity]). The names in brackets indicate the tables and fields.
To see the entire expression, widen the column by dragging its right edge.
Switch the query back to Datasheet View.
Close the query
2.9 Exploring Reports
Reports allow you to print information from tables in a well-organized layout, either on screen or on paper. The displayed data may come from multiple tables and/or queries, and calculated values are possible. You can also add titles, headings, headers, and footers to a report.
The main views of a report are:
- Report View
-
In this view, you can see the contents of the report.
- Print Preview
-
Shows how the report will look when printed.
- Design View
-
In this view, you can see and modify the design of the report.
Task 2.6 File: candy365.accdb
Open the database.
Open the Pralines per box report. The report opens in the Report View.
Switch the Pralines per box report to Print Preview in one of the following ways:
- Click the Print Preview button in the bottom right of the program window

- Choose Home tab> View (Views group) > Print Preview.
- Right-click the report name in the navigation pane and choose Print Preview from the shortcut menu.
- Click the Print Preview button in the bottom right of the program window
Switch the Pralines per box report to Design View in one of the following ways:
- Click the Design View button in the bottom right of the program window
- Choose Home tab> View (Views group) > Design View.
- Right-click the report name in the navigation pane and choose Design View from the shortcut menu.
- Click the Design View button in the bottom right of the program window
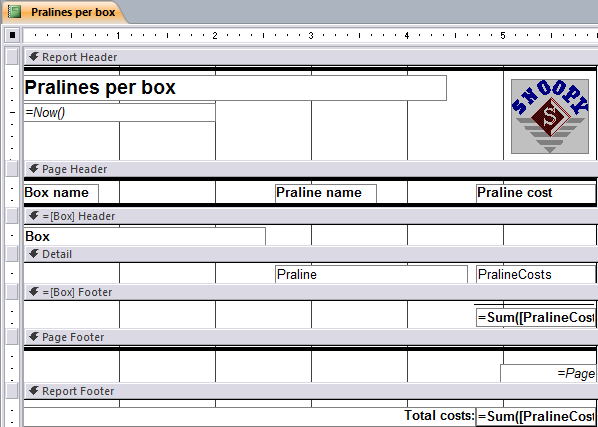
In Design View, you can change the layout of the report and add controls such as text boxes, labels, list boxes, checkboxes, and more.
Switch the report back to Report View using
 .
.Close the report
2.10 Sorting
You can sort the records in a table based on the values in one or more fields, either in ascending or descending order.
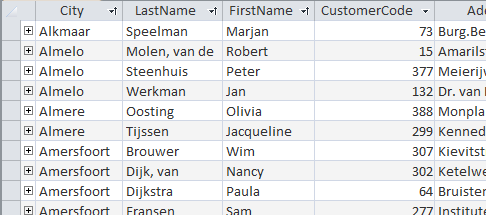
In the next exercise, you will modify the Customers table to create an overview sorted first by city, then by last name, and then by first name.
Task 2.7 File: candy365.accdb
Open the database.
Open the Customers table. The table opens in Datasheet View.
Select the City column by clicking its header and drag it to the left to make it the first column.
Similarly, move the LastName and FirstName columns to the second and third positions, respectively.
Click the arrow on the right side of the City column header and select Sort A to Z from the shortcut menu.
Access reorganizes the records in alphabetical order by city and shows a small upward-pointing arrow (![]() ) at the right side of the column header to indicate the sort order.
) at the right side of the column header to indicate the sort order.
Remove the sorting by choosing Home tab > Remove Sort (Sort & Filter group).
To sort by multiple fields, select the City, LastName, and FirstName columns.
Choose Home tab > Ascending
 (Sort & Filter group).
Access reorganizes the records in alphabetical order by city and shows a small upward-pointing arrow (![]() ) at the right side of the column header to indicate the sort order.
) at the right side of the column header to indicate the sort order.
- Close the Customers table and choose No when asked to save changes.
2.11 Filtering
Filtering is a useful way to display only the data you want to see. You can use filters to display specific records in a form, report, query, or table. For example, you can easily create a filter to show all pralines with chocolate type “Milk” and filling type “Marzipan.” Several filtering methods are discussed in the following exercises.
2.11.1 Simple Filter
Information needed: Show all pralines with chocolate type “White.”
Task 2.8 File: candy365.accdb
Open the database.
Open the Pralines table. The table opens in Datasheet View.
Click a value “White” in the ChocolateType column.
Choose Home tab > Selection (Sort & Filter group) > Equals “White”.
Access now shows the records (4 records) where the chocolate type is white. You can see that a filter has been applied:
- A small filter icon appears to the right of the ChocolateType column header (
 )
) - The status bar shows

2.11.2 Modifying a Filter
Information needed: Show all pralines with chocolate type “Milk.”
Here, you will modify the previous filter.
Task 2.9 File: candy365.accdb
- Click the filter icon to the right of the ChocolateType column header.
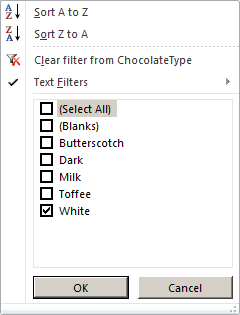
- In the dialog box, select “Milk” and deselect “White.” Click OK. Now, 18 records are shown, all with chocolate type “Milk.”
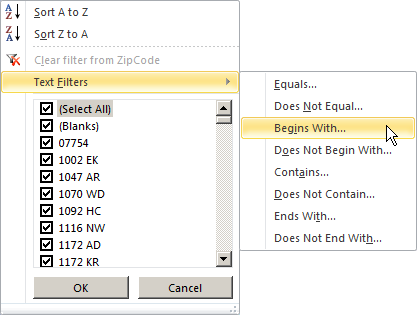
The options shown in Figure 2.23 depend on the field type. For a text field, there is a Text Filters submenu; for a numeric field, there is a Number Filters submenu.
2.11.3 Filter on Two Criteria
Information needed: Show all pralines with chocolate type “Milk” and filling type “Marzipan.”
Here, you add a second selection criterion.
Task 2.10 File: candy365.accdb
Click a value “Marzipan” in the FillingType column.
Choose Home tab > Selection (Sort & Filter group) > Equals “Marzipan”.
Three records are displayed with chocolate type “Milk” and filling type “Marzipan.”
Remove the filter by choosing Home tab >
 (Sort & Filter group).
Filtering is removed and all records are displayed again.
Another way to remove the filter is by clicking the Filtered button in the status bar. The text on the button will change to Unfiltered. Clicking again reapplies the last used filter.
2.11.4 Number Filter
Information needed: Show all pralines with costs from $0.25 to $0.35.
Task 2.11 File: candy365.accdb
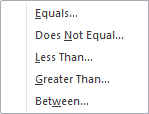
- Click the arrow in the PralineCosts column header, then choose Number Filters > Between….
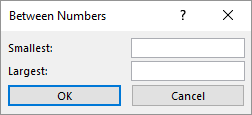
Enter 0.25 for Smallest, 0.35 for Largest, then click OK. Now, 22 records are shown with praline costs from 0.25 to 0.35.
Close the Pralines table and choose No when asked to save changes.
2.12 Printing
Access uses the printers available in Windows for printing.
Depending on the view of an Access object, the result can be printed. For example, you can print datasheet views for tables and queries, report views for reports, and form views for forms.
There is no option to print the design view, but Access has a tool called Database Documenter that lets you print the design characteristics of database objects.
Print options are available through File > Print. You have the following options:
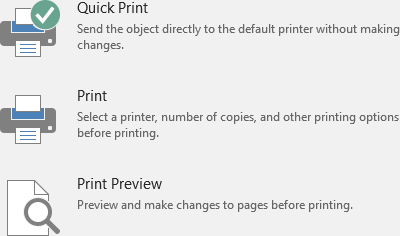
With Print Preview, you can customize the printout, such as page size, orientation, margins, and more.
2.13 Exercises
Exercise 2.1 Select Pralines (expl001)
Create a filter to select pralines with chocolate type “Milk” or “Dark” whose price is at most $0.30.
With numeric fields, you have several options for number ranges:
The result is 18 records.
Exercise 2.2 Select Customers in Specific Cities (expl002)
Select the customers who live in Enschede, Hengelo, and Almelo.
The result is 12 records.
Exercise 2.3 Select Customers by Zip Code (expl003)
Select customers whose zip code begins with 20 and who live in Amsterdam.
ZipCode is a text field, so you can use text filters:
The result is 3 records.