6 Forms
- Types of forms: main form, subform and linked form.
- Creating forms: automatic and manual.
- Working with controls.
- Performing calculations in a form.
- Forms with charts.
Forms provide organized and formatted views of data from tables and queries. They are especially useful for data entry.
6.1 Creating Forms
While it’s possible to enter data directly into tables, this is generally only practical for very simple tables. Typically, forms are used for data entry. Basic forms often display data from a single table or query. More advanced forms, such as main-subform combinations or linked forms, draw data from related tables or queries..
Beyond simply giving your forms an attractive appearance, the key advantage is the ability to apply various validations during data entry. Forms also support a variety of controls such as list boxes, checkboxes, buttons, and more.
You can build a form from scratch, let Access generate one for you, or use the Form Wizard and then adjust the generated form manually.
6.1.1 Main and Subforms
A subform is a form embedded within another form, known as the main form. Subforms are typically used to display data from tables or queries with a one-to-many relationship. The “one” side appears in the main form, and the “many” side in the subform.
Example 6.1 Orders by Customer
- Main form: Displays customer data from the Customer table.
- Subform: Displays the customer’s orders from the Orders table.
The main and subform are linked so that the subform only shows records related to the current main form record.
6.1.2 Linked Forms
Linked forms are separate forms that interact with each other. One form—usually the main form—contains a command button that opens another form when clicked. The records in both forms are synchronized. The button includes VBA code to open the second form, which is automatically generated by the wizard. No programming knowledge is required.
Whether you use linked forms or subforms depends on user preferences. If users only need basic customer data, there’s no need to display order information simultaneously. A button that opens the order details form is often more convenient.

6.2 Controls and Layouts
6.2.0.1 Controls
Controls are elements in a form or report that allow you to enter, display, or manipulate data. The Text Box is the most commonly used control for displaying data. Other frequently used controls include command buttons, checkboxes, and combo boxes.
Controls can be:
- Bound: Connected to a field in a table or query; used to display data from that source.
- Unbound: Not connected to any data source; used for static text, images, lines, etc.
- Calculated: Displays a value based on an expression rather than a data field.
6.2.0.2 Layouts
Layouts help align controls horizontally and vertically, giving your form a consistent look. Two layout types are commonly used:
Tabular Layout: Controls are arranged in rows and columns like a spreadsheet, with labels across the top.

Figure 6.3: Example of a tabular layout. Stacked Layout: Controls are arranged vertically with labels to the left.
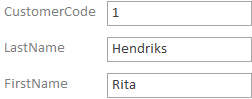
Figure 6.4: Example of a stacked layout.
6.2.0.3 Edit Controls
Since you often need to rearrange controls, it’s important to understand how to move and modify them. Many operations can be performed on multiple controls at once. Make sure the Property Sheet is visible before editing.
- Select a control: Click on it.
- Select multiple controls: Hold down the Shift key and click each control, or drag a rectangle around them.
- Deselect: Click an empty area of the form.
- Move: Drag the control using the upper-left handle. You can also set an exact position in the Property Sheet.
- Resize: Drag the middle or corner handles, or set dimensions via the Property Sheet.
- Align: Use tab Arrange > Align (Sizing & Ordering group).
- Delete: Press the Delete key.
6.3 Automatically Generated Form
When new records are added to a table, typically all fields must be filled. A form containing all fields is the easiest way to do this. The fastest method is to select the table and use Form from the [Create] tab to auto-generate a form. You can then modify it as needed.
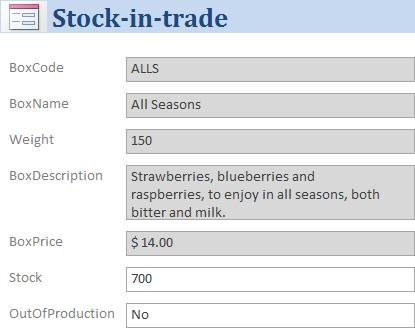
In this task, you’ll create a form for a warehouse employee to update box stock and indicate if a box is out of production. Other box details should not be editable through this form. The desired result looks like this:
Task 6.1 File: candy365.accdb
Open the database.
Select the Boxes table (no need to open it).
Click Create > Form (Forms group). A form is created and displayed in Layout View.
If Access detects a one-to-many relationship between your selected table/query and another table, it adds a subdatasheet for that related table. If multiple such tables exist, no subdatasheet is added.
In this case, Boxes has a one-to-many relationship with OrderDetails, so a subdatasheet appears showing related OrderDetails records.
If you don’t want this, you can delete the subdatasheet in Layout View by selecting it and pressing Delete.
Select the subdatasheet and press Delete.
Switch to Design View.
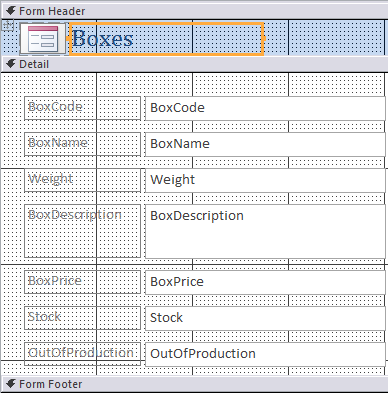
Automatically created forms include two controls per field: a Text Box and a linked Label.

By default, all controls are arranged in a stacked layout, meaning you can’t freely move them. To move a control freely, remove its layout using Arrange > Remove Layout (Table group).
- In the Form Header, change the label from “Boxes” to “Stock-in-trade”. Set Font Weight to
Boldand Font Size to20 pt.
You can show or hide the Property Sheet using the [Property Sheet] button or the F4 hotkey. To find properties more quickly, sort them alphabetically using the  button in the top right.
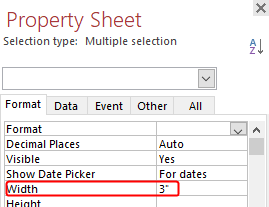
- Select all text boxes and set the Width property to
3". Click elsewhere to deselect.
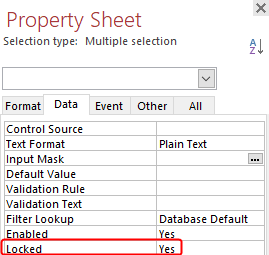
The Locked property makes a control read-only.
- Select all text boxes except Stock and OutOfProduction. Set their Locked (tab Data) property to
Yes.
While the fields are still selected, change their background color to light gray by either:
- Setting Back Color directly.
- Right-clicking and choosing Fill/Back Color from the shortcut menu.
Switch to Form View to check the result.
Close the form and save the changes.
Name the form Stock-in-trade and click OK.
6.4 Main and Subform
The easiest way to create a main form with a subform is by using the Form Wizard. This wizard generates both forms and handles the linking automatically.
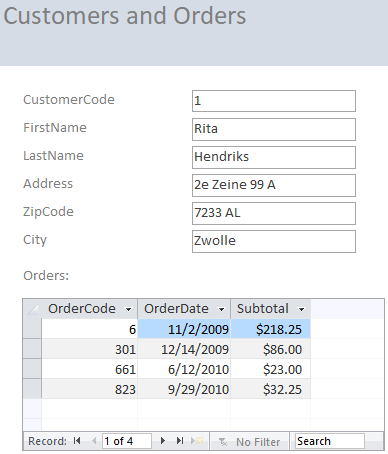
The goal is to create a form that displays customer information (code, name, address) and, additionally, shows their corresponding orders (order code, date, and subtotal).
Customer data will appear in the main form and is sourced from the Customers table. The subform will show order data: OrderCode, OrderDate, and a calculated Subtotal. The subtotal is derived from the fields Quantity and BoxPrice in the Boxes table.
To calculate the subtotal, you’ll use a query that contains all necessary fields and serves as the data source for the subform. A ready-made query named Orders with subtotals is already available. It includes the CustomerCode field to link the main and subform.
Task 6.2 File: candy365.accdb
Open the database.
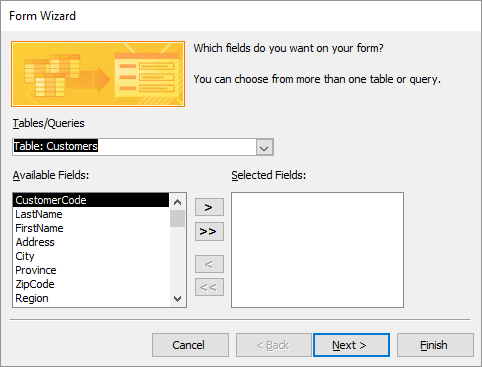
Go to tab Create > Form Wizard (Forms group).
From Table: Customers, add the following fields: CustomerCode, FirstName, LastName, Address, ZipCode, City, Telephone.
- Next, select Query: Orders with subtotals and add: OrderCode, OrderDate, Subtotal. Click Next.
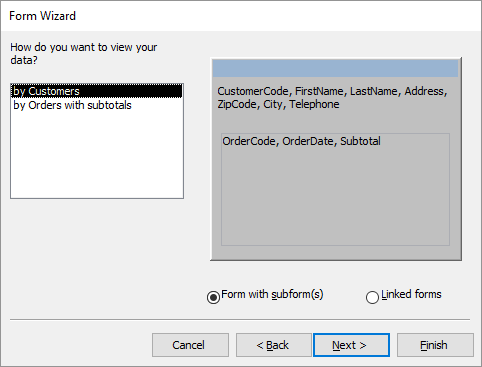
Review the grouping structure and click Next. Select Datasheet as the subform layout.
Click Next. You’ll be prompted to enter titles for the forms.
Set the form titles as follows:
- Form title: “Customers and Orders”
- Subform title: “Customers and Orders Subform”
Click Finish.
You can modify the layout and design of both the main form and subform as needed.
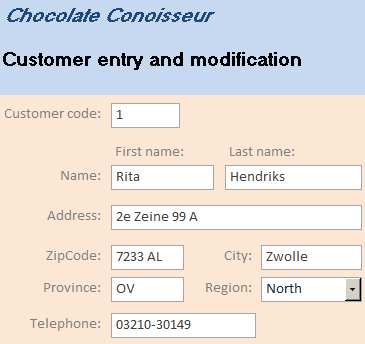
6.5 Customer Data Entry Form
In this task, you’ll create a form for adding new customers and editing existing ones. You’ll also practice moving and aligning controls to match a specific layout:
Task 6.3 File: candy365.accdb
Open the database.
Select the Customers table (no need to open it).
Click Create > Form (Forms group). The form opens in Layout View.
Since Customers has a one-to-many relationship with Orders, a subdatasheet based on Orders is added automatically.
Delete the subdatasheet by selecting it and pressing Delete.
Switch to Design View.
Remove the form logo in the header.
Save the form as Customer entry and modification.
Increase the height of the Form Header by dragging the top of the Detail section downward.
Change the title label from “Customers” to “Chocolate Connoisseur”. Set the font to
MS Sans Serif,14 pt,italic, andbold.Insert a new label via Design > Label (group Controls) and place it below the title. Type “Customer entry and modification” and format it with
MS Sans Serif,14 pt,bold,black.Select all controls in the Detail section by dragging a rectangle around them.
Click Arrange > Remove Layout (Table group) to unstack the layout.
Deselect the controls.
Arrange the controls to match the desired layout.
- Align controls using Arrange > Align (group Sizing & Ordering).
- Add a new Label called
Name:before the first and last name fields. - Adjust size using Width and Height.
- Position controls using Top and Left.
- Set background color using Back Color.
Switch to Form View to test the layout
ave and close the form.
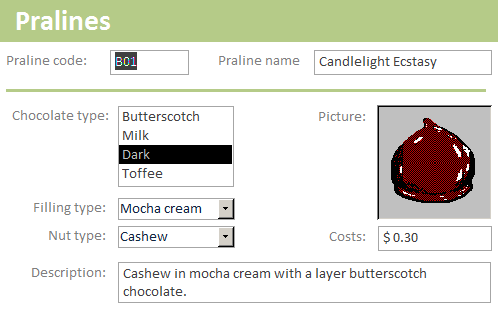
6.6 Praline Data Entry Form
This task involves creating a form to add or edit pralines. You’ll also replace three text boxes with combo boxes for better usability. The final layout should look like Figure 6.14.
Task 6.4 File: candy365.accdb
Open the database.
Select the Pralines table (no need to open it).
Click tab Create > Form (Forms group).
Switch to Design View.
Delete the BoxDetails subdatasheet.
Remove the form logo in the header.
Save the form with as Praline information.
Change the header text format to:
Calibri,22 pt,bold,white coloron agreen background.Remove the stacked layout by selecting all controls in the Detail section and choosing Arrange > Remove Layout (Table group).
Deselect all controls.
Delete the fields ChocolateType, FillingType, and NutType. Reorganize the remaining fields to match the layout.
Use Design > Line (group Controls) to draw a horizontal line under PralineCode and PralineName. Set line thickness to
2 ptand match the header background color.Add a combo box for ChocolateType using the List Box Wizard with these settings:
- Enter values manually.
- One column with values:
Butterscotch,Milk,DarkandToffee. - Store value in ChocolateType.
- Label: “Chocolate type:”
Create a Combo Box for FillingType with values:
Amaretto,Blueberry,Cherry cream,Coconut,Marzipan,Mocha cream,None.Create a Combo Box for NutType with values:
Almond,Cashew,Hazelnut,Macadamia,Paranut,Pecan,Pistachio,Walnut,None.Switch to Form View and test the form.
Close the form and save the changes.
6.7 Boxes Data Entry Form
In this task, you’ll replace a Text Box on an existing subform with a Combo Box that uses a query as its data source.
The existing Boxes form allows you to select pralines only by their PralineCode. The goal is to enable selection by praline name as well.
The Boxes form consists of a main form (Boxes) and a subform (Boxes subform). Praline selection happens in the subform. Therefore, only the subform needs to be modified—specifically, replacing the PralineName text box with a Combo Box.
However, the Boxes subform is based on the BoxDetails table, which does not contain the PralineName field. To support name selection, you first need to create a query that includes both PralineName and PralineCode, and sorts the results alphabetically by name. This new query will be the data source for the combo box.
Task 6.5 File: candy365.accdb
Query: Choose praline
Open the database.
Go to Create > Query Design (Queries group). Add the Pralines table. Add the fields PralineName and PralineCode. Sort by PralineName in ascending order.
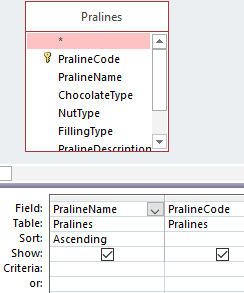
- Save the query as Choose praline and close it.
Modify the Subform
Open the Boxes subform in Design View.
Delete the PralineName field from the Detail section.
Go to Design > Combo Box (Controls group) and draw a rectangle where the PralineName field was. The Combo Box Wizard starts.
Answer the wizard prompts as follows:
- Choose: I want the values to come from another table or query.
- Select the Choose praline query.
- Add the fields PralineName and PralineCode.
- Sort by PralineName (ascending).
- Adjust column widths if needed.
- Store the value from PralineCode into the Code field.
- Accept the default label (this will be removed later).
Delete the auto-generated label, as a label already exists in the form header.
- Select the Combo Box and check the Limit To List property in the Property Sheet (tab Data). If it’s not set to
Yes, change it.
Setting “Limit To List” to Yes ensures that only predefined praline names can be selected, new names cannot be entered manually.
Save and close the Boxes subform.
Open the main Boxes form and test the combo box functionality.
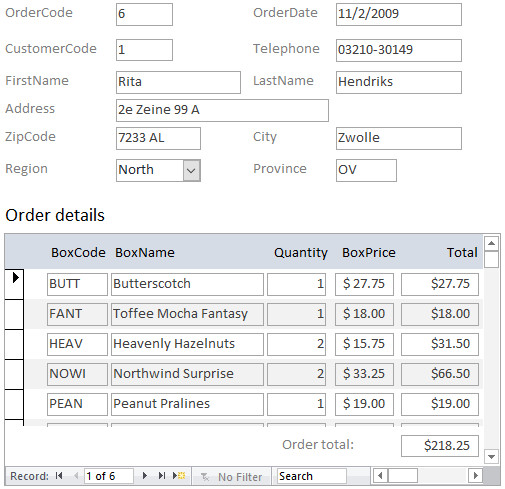
6.8 Orders Data Entry Form
To enter new orders and view existing ones, you’ll create an order form that includes both main form data and order details in a subform.
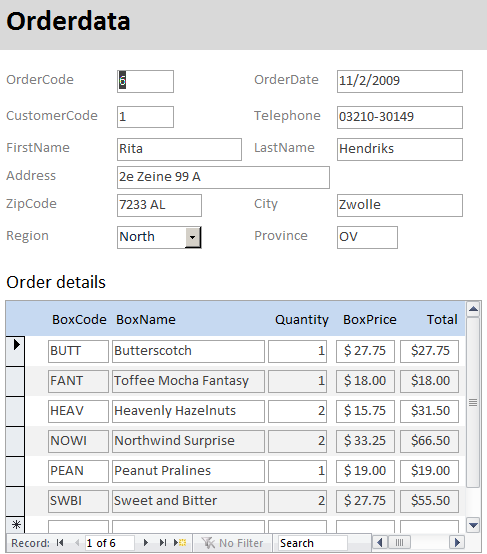
- The main form will display data from the Customers and Orders tables.
- The subform will show data from OrderDetails and Boxes, including a calculated Total field.
To supply data to these forms:
- Create a query Orders-Customers that combines the necessary fields from Orders and Customers.
- Create a query OrderDetails-Boxes combining data from OrderDetails and Boxes, with the Total calculated as
Quantity * BoxPrice.
Then use the Form Wizard to create the form and subform based on these queries.
Task 6.6 File: candy365.accdb
Create Query: Orders-Customers
Open the database.
Go to Create > Query Design (Queries group). Add [Orders] and [Customers].
Add all fields from tbothtables.
You can use * to add all fields from a table.
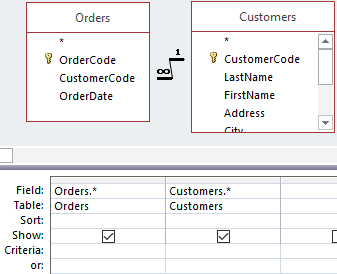
- Save the query as Orders-Customers and close it.
Create Query OrderDetails-Boxes
Go to tab Create > Query Design (group Queries). Add tables OrderDetails and Boxes.
Add all fields from both tables.
Add a calculated field:
Total: [Quantity]*[BoxPrice].
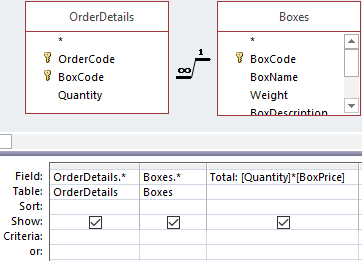
- Save the query as OrderDetails-Boxes and close it.
Create the Form and Subform
Go to tab Create > Form Wizard.
First, select Orders-Customers and add all fields except Orders.CustomerCode.
Then select OrderDetails-Boxes and add: [Boxes.BoxCode], [BoxName], [Quantity], [BoxPrice], [Total]
Click Next, and choose to view the data by Orders-Customers. This makes it the main form, with OrderDetails-Boxes as the subform.
Click Next again and select the Tabular layout for the subform.
Choose a style and click Next.
Enter the form names:
- Main form: Orderdata main`
- Subform: Orderdata sub`
Click Finish. The form opens automatically.
Adjust the layout of both forms to achieve the desired final design.
6.9 Total Order Amount
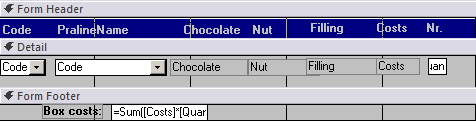
In this section, you’ll enhance the form created in Section 6.8 by calculating and displaying the total amount of an order in the subform footer.
Task 6.7 File: candy365.accdb
Open the database.
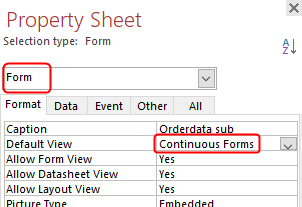
Open the Orderdata sub form in Design View.
In the Property Sheet, set the selection type to Form. Change the Default View to Continuous Forms.
This setting is necessary because otherwise the total cannot be calculated.
Increase the height of the Form Footer section by dragging its bottom edge downward.
Go to Design > Text Box (Controls group) and draw a text box in the footer where the total should appear.
Set the Control Source of the text box to
=Sum([Total])and its Format toCurrency.Save and close the subform.
Open the main form Orderdata main and verify the total appears and updates correctly.
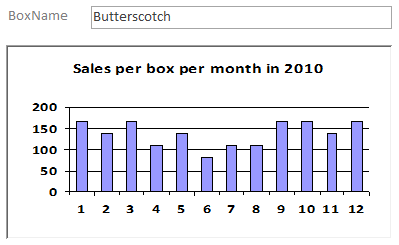
6.10 Form with Chart
GOAL
Create a form with a column chart showing sales per box, per month, for the year 2010.
ANALYSIS
BoxName: from the Boxes table.
Sales: calculated as
[Quantity]*[BoxPrice].BoxPrice: from Boxes table.
Quantity: from OrderDetails table.
OrderDate: from Orders table; Month and Year can be calculated with the functions
Month([OrderDate])andYear([OrderDate]).
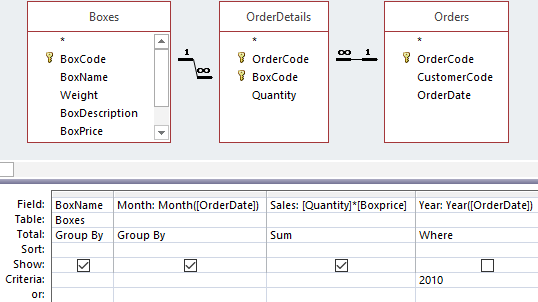
You will:
- Create a query that outputs BoxName, Sales, Month, and Year.
- Group by [BoxName] and then by [Month].
- Filter on [Year] = 2010.
Task 6.8 File: candy365.accdb
Create Query
Open the database.
Go to tab Create > Query Design (Queries group) and add the tables Boxes, OrderDetails, and Orders.
Add field BoxName from table Boxes, and create the calculated fields:
Month: Month([OrderDate]),Sales: [Quantity]*[BoxPrice]enYear: Year([OrderDate]).Click Design > Totals (Show/Hide group).
Change in the column Sales the Group By operator in
Sumand in the column Year inWhere. Add2010as criteria for Year.
- Save the query as Sales per box per month in 2010 and close it.
After reopening the query in Design View, Access may reformat the [Sales] column to:
- Field:
Sales: Sum([Quantity]*[BoxPrice]). - Total:
Expression.
Create Form
Click tab Create > Form Wizard. Use table [Boxes] and select BoxName. Click Next.
In the wizard:
- Choose Datasheet layout.
- Title: “Sales per box per month in 2010”.
- Save the form with the same name as the title.
Open the form in Design View and expand the Detail section.
Click tab Design > Chart (Controls group),
 , and draw a rectangle. The Chart Wizard starts.
In the wizard:
- Use query Sales per box per month in 2010
- Fields: Month, Sales.
- Chart type: Column Chart.
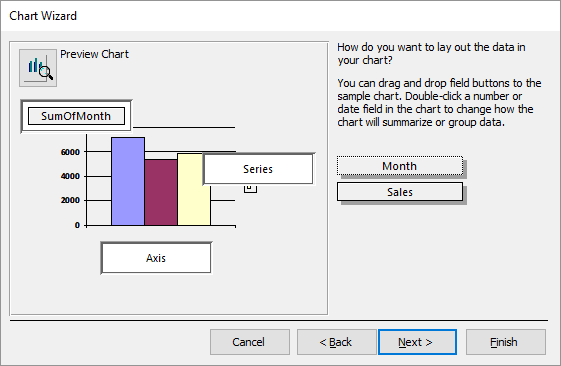
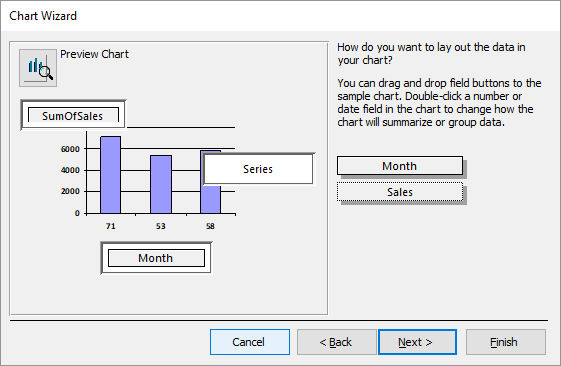
Drag SumOfMonth to the horizontal axis. It changes to
Month.Drag Sales to the vertical axis. It updates to
SumOfSales.
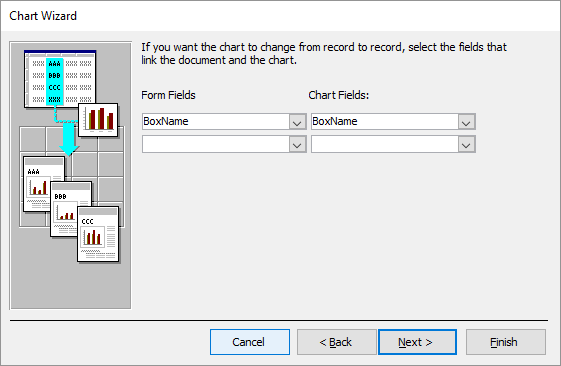
- Click Next. Now you should select the field in the form that should be linked to the field in the chart. In both cases it is BoxName.
- Click Next. Set the chart title: “Sales per box per month in 2010”. Disable the legend and click Finish.
In Design View, a placeholder chart appears, not live data.
Save and close the form.
Open the form in Form View, browse some records, then close the form.
6.11 Linking forms
The easiest way to create linked forms is by using the Form Wizard. This wizard generates all necessary forms, creates the required links, and adds a command button on the main form to open the related form.
The goal is to create a form that displays customer information, with a command button to open a separate form that shows the customer’s order details. See Figure 6.27.
The main form displays customer data, which comes from the Customers table. The linked form shows the customer’s orders, with order code and date, from the Orders table. It also includes a subform that shows order details, sourced from the OrderDetails table.
Task 6.9 File: candy365.accdb
Open the database.
Go to tab Create > Form Wizard (group Forms).
Select Table: Customers.
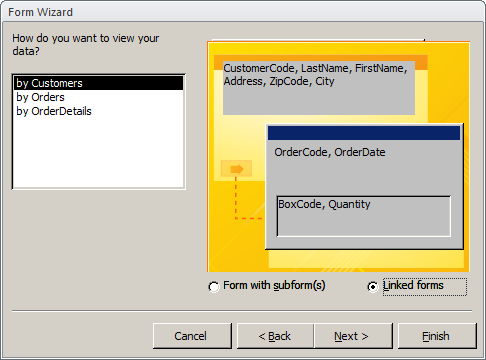
Add the following fields:
From Customers: CustomerCode, LastName, FirstName, Address, ZipCode, City.
From Orders: OrderCode, OrderDate.
From OrderDetails: BoxCode, Quantity.
Click Next. Choose to view data by Customers and select Linked Forms as the layout.
Click Next. You’ll be prompted to name the forms.
Use the following names:
- Main form: CustomerOrders
- First linked form: CustomerOrdersSub1
- Subform: CustomerOrdersSub2
Click Finish.
The CustomerOrders main form appears. However, the command button to open the linked form is hidden beneath the form title and cannot be clicked.

Open the CustomerOrders form in Design View.
- Delete the CustomerOrders label.
- Select the command button and, in the Property Sheet, change the caption to “Order data”.
Optionally, adjust the layout of all three forms.
Switch to Form View and test the command button.
Save and close the form.
By default, Access opens each object (tables, queries, forms, reports) in a separate tab. However, with linked forms, this isn’t ideal, you won’t see both forms at once.
To show forms in overlapping windows instead of tabs:
- Go to File > Options > Current Database.
- Under Document Window Options, select Overlapping Windows.
6.12 Exercises
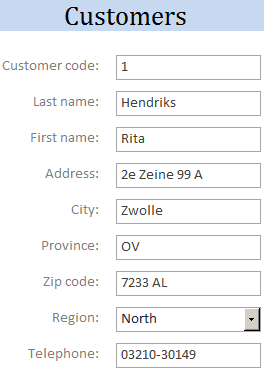
Exercise 6.1 Customers (form001)
Create a form named form001 that looks like the following example.
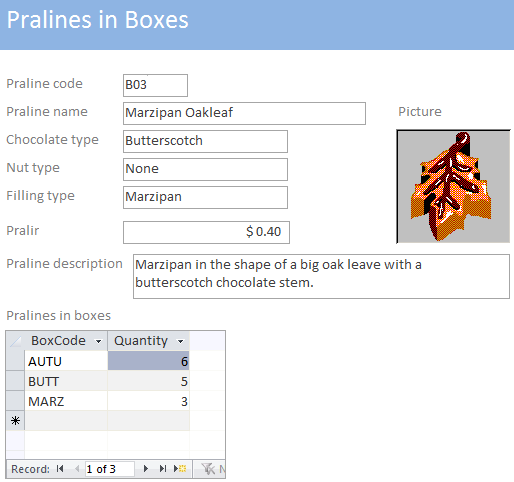
Exercise 6.2 Pralines in Boxes (form002)
Create a main form with a subform that shows which boxes contain a specific bonbon and in what quantity. Name the forms:
- Main form: form002 main
- Subform: form002 sub
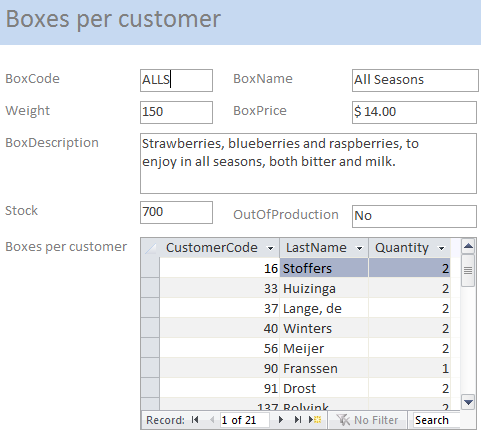
Exercise 6.3 Boxes per Customer (form003)
Create a main form with a subform. The main form displays box data; the subform shows total sales per customer for the selected box.
First, create a query that calculates total box sales per customer. Name everything as follows:
- Query: Boxes per customer
- Main form: form003 main
- Subform: form003 sub