4 Tables
- Understand the organization of tables and the relationships between them.
- Learn the various methods for creating tables.
- Explore field properties.
- Validate data input using input masks and validation rules.
- Understand referential integrity.
4.1 About Tables
In a database, data is stored in tables. Each table consists of fields for different types of data. For example, there might be a field for a person’s last name and another for their first name. While data can be displayed in various ways, it is always stored in tables. In practice, you begin by conducting an information analysis to determine which tables and fields are needed. For larger databases, this is often done using a process called normalization. Typically, relationships are also established between tables, allowing data in one table to be linked to data in another.
Empty tables serve no purpose unless data is entered. If the data already exists in other files, such as Excel spreadsheets, it can be imported directly into Access.
4.2 Fields in Tables
Fields define the structure of a table. Each piece of data is stored in a field, and each field has properties that determine its behavior. To create a field, you need:
- A field name (required)
- A data type (required)
- A description (optional)
4.2.1 Field Names
The database design determines the kind of data each field will store. Often, field names are predetermined, but you should always use meaningful names. Although descriptions can be added, clear names are usually more effective.
Field names must:
- Be unique within a table
- Not start with a space
- Not contain the following characters: period (
.), exclamation point (!), or brackets ([ ])
4.2.2 Data Types
The data type defines what kind of data can be stored in a field. This is a critical property. For instance, a Text field can contain letters and numbers, while a Number field can only store numeric data. A good rule of thumb: if you need to perform calculations with the field, use the Number data type. For example, a field for item prices should be a Number, while a product ID might be a Text field.
| Data Types | Values | Explanation |
|---|---|---|
Short Text |
Alphanumeric | Up to 255 characters. |
Long Text |
Alphanumeric | Up to 1GB of text (formerly called Memo). |
Number |
Numeric | Range: -231 to 231 - 1. |
Large Number |
Numeric | Range: -263 to 263 - 1. |
Date/Time |
Dates and Times | Used for storing calendar dates and times. |
Currency |
Monetary values | Stored with four decimal points of precision. |
AutoNumber |
Auto-generated | Unique numbers automatically assigned per record. |
Yes/No |
Boolean | Yes/No, True/False, or On/Off. |
OLE Object |
External objects | Includes images, graphs, Excel sheets, Word docs, etc. |
Hyperlink |
Hyperlinks | URLs and email addresses. |
Attachment |
File references | Can store multiple files (e.g., photos) per record. |
Calculated |
Derived values | Results from an expression using other fields. |
You can also choose Lookup Wizard as a data type. This launches the Lookup Wizard, which lets you define a field that displays values from another table or a custom list.
4.2.3 Field Properties
Field properties provide additional control over how data behaves. The available properties depend on the selected data type. The most common properties include:
- Field Size
-
Controls the length of text or the numeric range. For text, it sets the maximum character count. For numbers, you can select
Byte,Integer,Long Integer,Single,Double, orDecimal. - Format
-
Determines how data is displayed in tables, queries, forms, and reports. Formats vary by data type and can be customized or selected from a list.
- Decimal Places
-
Used with
NumberandCurrencyfields to set the number of decimal digits. - Default Value
-
Automatically fills a field with a preset value when a new record is created. You can still modify the value manually.
- Required
-
Specifies whether a value must be entered. Options are
YesorNo(default).
Special field properties like Input Mask, Validation Rule, and Validation Text help enforce data consistency and accuracy.
4.2.4 Number Field Sizes
Possible values for the Number data type include:
Byte: 0 to 255Integer: -32,768 to +32,767Long Integer: -2,147,483,648 to +2,147,483,647Single: Approx. -3.4 x 1038 to +3.4 x 1038 (7-digit precision)Double: Approx. -1.797 x 10308 to +1.797 x 10308 (15-digit precision)Decimal: Approx. -9.999 x 1027 to +9.999 x 1027
4.3 Validation
To ensure users enter data in a specific format, you can apply input masks. You can also define validation rules to check if values meet certain conditions and, if not, display a helpful validation message.
4.3.1 Input Masks
An input mask enforces a predefined format for data entry in a field. It consists of a combination of characters and symbols that define the pattern. For instance, an input mask can ensure that a phone number has exactly 10 digits. Input masks can be used with Text, Number, Currency, and Date/Time fields.
An input mask consists of one required and two optional parts, separated by semicolons:
First part (required): Defines the structure, including placeholders and literal characters such as parentheses or hyphens.
Second part (optional): Indicates whether the literal characters are stored.
0stores them;1displays them without storing.Third part (optional): Sets the placeholder character (default is underscore
_).
Setting the second part to 1 can save database space.
| Character | Meaning |
|---|---|
| 0 | Required digit (0-9) |
| 9 | Optional digit (0-9) |
| # | Optional digit, plus, minus, or space |
| L | Required letter |
| ? | Optional letter |
| A | Required letter or digit |
| a | Optional letter or digit |
| & | Required character or space |
| C | Optional character or space |
| . , : ; - / | Decimal and thousands placeholders, date and time separators. The character you select depends on your Microsoft Windows regional settings. |
| > | Convert following characters to uppercase |
| < | Convert following characters to lowercase |
| ! | Fill from left to right instead of right to left |
| \ | Escape next character |
| “” | Characters in quotes are displayed literally |
You can create input masks manually or by using the Input Mask Wizard.
Example 4.1 US Telephone Number
Input mask: (999) 000-000;0;-
Explanation:
(999): optional three-digit area code000-000: required seven-digit number;0: stores literal characters;-: uses hyphen (-) as the placeholder
Example 4.2 Zip Code
Input mask: 0000\ >LL
Explanation:
0000: four required digits\: literal space>LL: two required uppercase letters
4.3.2 Validation Rule and Validation Text
Validation rules restrict the values that can be entered into a field. If the entered data violates the rule, Access displays the validation text.
- Validation Rule
-
An expression that must evaluate to true. If not, the input is rejected.
- Validation Text
-
A message shown when a value violates the validation rule.
Field names go in square brackets:
[OrderDate]Dates use
#symbols:#12/31/2024#Text uses quotes: “New York”
Wildcards:
?= one character*= any number of characters#= one digit
Table 4.3 lists the most used operators.
| Operator | Purpose | Example |
|---|---|---|
| < | Less than | <100 |
| <= | Less than or equal | <=15 |
| > | Greater than | >10 |
| >= | Greater than or equal | >=0 |
| = | Equal to | =21 |
| <> | Not equal to | <>0 |
| AND | Both conditions true | >=1 AND <=9 |
| OR | Either condition true | “m” OR “f” |
| NOT | Condition not true | NOT >10 |
| IN | Value in list | IN (“Berlin”,“London”,“Paris”) |
| BETWEEN | Value in range | BETWEEN 1 AND 9 |
| LIKE | Matches pattern | LIKE “Ams*” |
Example 4.3 Date Validation
- Rule:
>=#1-1-2010# - Text:
Enter a date from January 1, 2010 onward.
Example 4.4 Invoice Number Validation
- Rule:
Like "[0-9][0-9][0-9][0-9]" - Text:
Invoice number must be exactly four digits.
Example 4.5 Simple Email Validation
- Rule:
Like "*@*.???" - Text:
Enter valid email address.
4.4 Create a New table Manually
Purpose: Create a new table from scratch and assign a primary key.
You need to create a new table named Transport Companies to store contact details for transportation companies.
Task 4.1 File: candy365.accdb
Open the database.
Go to Create tab > Table (Tables group). A new table will be created with one default field named ID, which you can delete if not needed.
Switch to Design View. Since the table is not yet named, the Save As dialog box will appear.
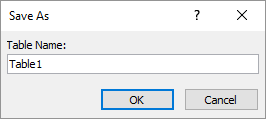
Enter the name
Transport Companiesand click OK. The table Transport Companies will now open in Design View.Right-click the ID field and choose Delete Rows. Confirm the deletion.
Add the following fields:
Since the company name is unique, you can use it as the primary key.
Select the first row and click Design tab > Primary Key (Tools group). A key icon
 will appear at the beginning of the row.
Switch to Datasheet View. When prompted to save the table, click Yes.
Enter the following records:
- Close the Transport Companies table.
4.5 Importing an Excel Worksheet as a Table
Purpose: Import an Excel worksheet into Access as a new table.
Access integrates well with Excel, making it easy to import a worksheet as either a new table or into an existing one.
Task 4.2 File: candy365.accdb
Open the database.
Go to External Data tab > New Data Source (Import & Link group) > From File > Excel.
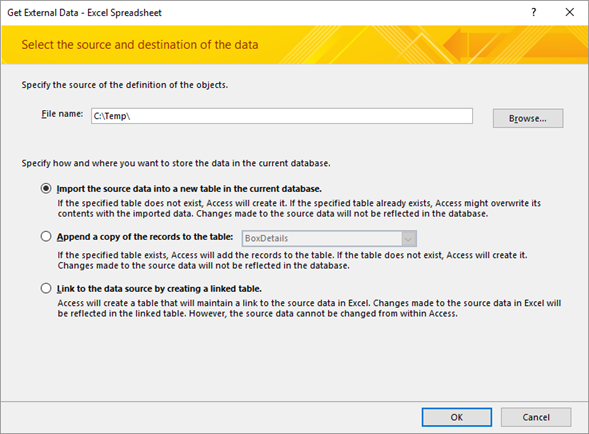
Use the Browse button to locate the file
transport.xlsx.Select Import the source data into a new table in the current database and click OK. The Import Spreadsheet Wizard opens.
Check First Row Contains Column Headings and click Next. You can now adjust field properties.
Click Next. You’ll be asked to define a primary key.
Choose No primary key and click Next.
Enter
Transportas the table name and click Finish.Click Close when the import is complete.
Open the new table to review the results, then close it.
4.6 Creating a List Box
Purpose: Configure a field to use a list box for data entry.
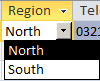
When only a limited set of predefined values is allowed in a field, a list box is a useful solution. For example, the Customers table has a Region field that should only contain North or South. You’ll change the data type to a list box.
List boxes do not automatically update forms based on the modified table, such as the Registration form. To enable the list box in the form, open the form in Design View, delete the Region field, and add it again. This step is not included in this task.
Task 4.3 File: candy365.accdb
Open the database.
Open the Customers table in Design View.
Click in the Data Type box for the Region field.
Click the dropdown arrow and select Lookup Wizard….
Choose I will type in the values that I want. and click Next.
Enter “North” in the first cell and “South” in the second.
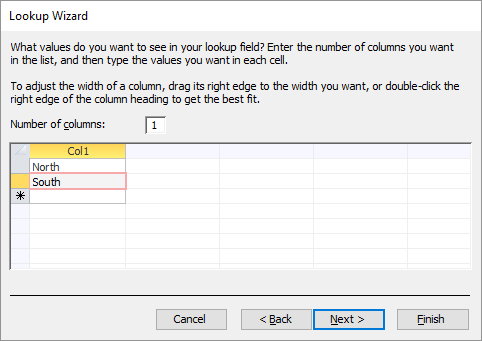
Click Finish.
Switch to Datasheet View and click Yes to save changes.
Verify that the list box appears in the Region field and works as expected.
4.7 Relations Between Tables
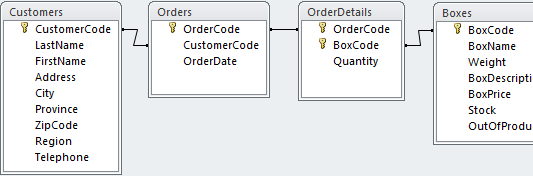
A relationship exists between two tables when a key field from one table is linked to a corresponding key field in another table. The related fields typically have the same name and data type. Relationships are established as part of the normalization process, which removes redundant data and organizes it across multiple tables.
When tables are related, you can create queries, forms, and reports that combine information from multiple tables and present it as a single entity.
4.7.1 One-to-Many Relationship
The one-to-many relationship is the most common type. In this relationship, a single row in Table A can be associated with multiple rows in Table B. However, each row in Table B relates to only one row in Table A. This is often referred to as a parent-child relationship.
For example, the Customers table is related to the Orders table via the CustomerCode field. A customer can place multiple orders, but each order belongs to one customer only. Therefore, Customers is on the “one” side, and Orders is on the “many” side of the relationship. Customers is the primary table, and Orders is the related table.
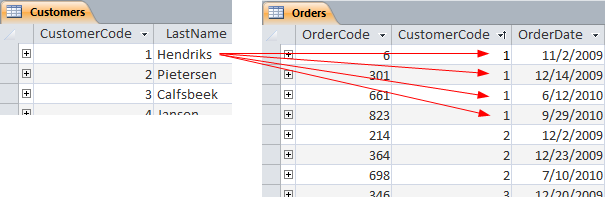
The field used to establish the relationship on the “one” side must contain unique values, usually a primary key. The field on the “many” side is known as the foreign key.
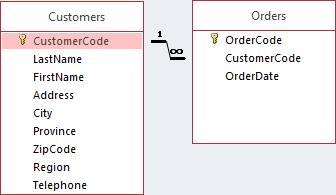
In Access, a one-to-many relationship is shown by a line connecting the primary key to the foreign key, with a “1” on one end and an infinity symbol (∞) on the many end.
4.7.2 One-to-One Relationship
In a one-to-one relationship, each row in Table A corresponds to no more than one row in Table B, and vice versa. This type of relationship is uncommon, as such related data is typically stored in a single table. Sometimes, it’s used to split a large table into two smaller ones. Generally, this design should be avoided unless there is a specific reason.
4.7.3 Many-to-Many Relationship
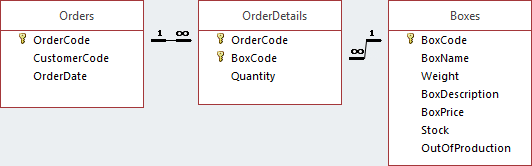
In a many-to-many relationship, rows in Table A can match multiple rows in Table B, and vice versa. This type of relationship cannot be directly created in Access. Instead, you must use a third table—called a junction table which creates two one-to-many relationships.
For example, consider the relationship between Orders and Boxes. One order may include several boxes, and one box may be part of multiple orders. The OrderDetails table serves as the junction table. It links to Orders through OrderCode and to Boxes through BoxCode, each via a one-to-many relationship.
4.7.4 Creating, Modifying, and Deleting Relationships
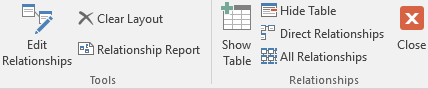
Relationships are managed in the Relationships window, which can be opened from Database Tools tab > Relationships (Relationships group).
The ribbon includes commands for editing relationships.
If no relationships have been created yet, the window will be empty. Click Show Table to add tables and queries to the window.
To create a relationship, drag the primary key from one table to the corresponding foreign key in another. This opens the Edit Relationships dialog box.
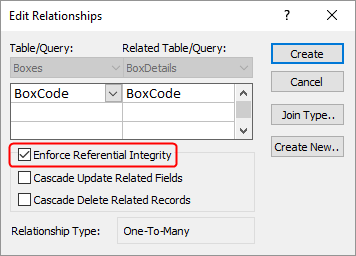
To enforce referential integrity, check the Enforce Referential Integrity box.
To modify a relationship, first select the relationship line—it will appear thicker—then double-click it to open the Edit Relationships dialog box.
To delete a relationship, select the line and press the DELETE key.
4.7.5 Referential Integrity
Referential integrity ensures consistency between related tables. When enabled, Access prevents changes that would break the link between related records.
You can enable referential integrity via the Edit Relationships dialog box by checking the Enforce Referential Integrity option.
You cannot enter a value in the foreign key field of the related table if that value doesn’t exist in the primary table. For example, you can’t enter an order for a customer who doesn’t exist. Create the customer first.
You cannot delete a record from the primary table if matching records exist in a related table. For example, you can’t delete a Customers record if that customer has orders in the Orders table.
You cannot change the primary key value in the primary table if related records exist in another table. For example, you can’t change a customer’s code if their orders still reference it.
If you attempt an action that violates these rules, Access displays an error message, like the one shown in Figure 4.13.

To enable referential integrity, these conditions must be met:
- Both tables are in the same Access database.
- The linked field in the primary table must be a primary key or have a unique index.
- Linked fields must have the same data type, and numeric fields must match in size.
- Existing data must not violate referential integrity.
AutoNumber fields can be linked to Number fields as long as their Field Size property is set to Long Integer.
If existing data violates these rules, you must resolve the issues first. Common causes include:
The linked fields differ in data type or size. This can be fixed by modifying the table designs.
The related table contains values that don’t exist in the primary table. This happens when records are deleted from the primary table but remain in the related one, creating “orphan” records. Use the Create tab > Query Wizard (Queries group) > Find Unmatched Query Wizard to identify and remove them.
4.7.6 Creating the Boxes–BoxDetails Relationship
To define a relationship, determine the primary and related tables, and the linking fields:
- Primary table: Boxes, field: BoxCode
- Related table: BoxDetails, field: BoxCode
Task 4.4 File: candy365.accdb
Open the database.
Go to Database Tools tab > Relationships (Relationships group). The Relationships window will appear, showing existing relationships.
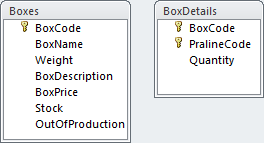
- Drag the BoxCode field from Boxes to the BoxCode field in BoxDetails.
Check Enforce Referential Integrity and click Create. The relationship will now be visible in the window.
Close the Relationships window and click Yes to save changes.
4.8 Exercises
Exercise 4.1 Prevent Duplicate Names (tabl001)
The Suppliers table has a Supplier field. Currently, duplicate supplier names are allowed. Prevent this by setting the Indexed property of the field to Yes (No Duplicates).
Exercise 4.2 Name Order Formatting (tabl002)
The customer with CustomerCode 15 has the last name Molen, van de and first name Robert. When printing labels, this results in Robert Molen, van de, which is incorrect. You want it to read Robert van de Molen. Simply changing the LastName to van de Molen will affect sorting. Think of a better solution. You may propose changes to the table design but do not apply them in the database.
Exercise 4.3 Title Field with List Box (tabl003)
Some customers prefer to have their title included in mailings. Add a Title field to the Customers table. Use the Lookup Wizard to create a list with these values: ing., ir., drs., mr., dr.
Exercise 4.4 Currency Format (tabl004)
Use the Transport table created earlier. If it’s not in your database, either:
- Recreate the table manually, or
- Use the
transport.accdbdatabase, where it already exists.
Open the Transport table. Notice the transport costs are not formatted as currency. Change the Format property of the TransportationCosts field to display currency using your local symbol. Switch to Datasheet View to observe the result.
The displayed currency symbol depends on your Windows regional settings.
Exercise 4.5 Composite Key (tabl005)
In the Transport table, ID TransportCompany has repeated values, so it cannot serve as a primary key. Similarly, DeliveryProvince is also repeated. However, the combination of both fields is unique and can be used as a composite primary key. Set this composite key in the Transport table.
In this exercise, you need the table Transport that you should have made earlier (see Section 4.4). When this table is not present in your database, you have two possibilities:
- You still perform the task by creating this table.
- You use database
transport.accdbwhere the table Transport already was made for you.
Exercise 4.6 Target Group Field (tabl006)
Customers should be classified into target groups: top customer, good customer, or small customer. Add a TargetGroup field to the Customers table using a list box with these options.
Exercise 4.7 Create Relationship: BoxDetails–Pralines (tabl007)
Create a relationship between BoxDetails and Pralines, and enforce referential integrity.
Exercise 4.8 Employees Table (tabl008)
In late 2010, the company decided to track which employee processed each order. An Excel file already contains employee data. Do the following:
- Import the Excel file
employees.xlsxand name the table Employees. Assign a suitable primary key. - dd an EmployeeCode field.
- Create a relationship between Orders and Employees, and enforce referential integrity.
Exercise 4.9 Contact Registration (tabl009)
The marketing department wants to log all customer contacts (phone, mail, email, visits) to track time and costs. Each entry should include the contact type, date, start and end time, subject, and any costs.
Create a new table Contacts and link it to Customers, enforcing referential integrity.
If the Employees table exists (see Exercise 4.8), include which employee logged the contact by linking Contacts to Employees.
Exercise 4.10 Complaints Registration (tabl010)
Customers sometimes submit complaints. These can be categorized as:
- Damaged packaging
- Box not delivered on time
- Expired best-before date
- Poor taste of pralines
Each complaint refers to an order. Create a Complaints table and relate it to Orders, enforcing referential integrity.
Exercise 4.11 Check Referential Integrity (tabl011)
Verify whether referential integrity is enforced in relationships involving Customers, Orders, OrderDetails, Boxes, BoxDetails, and Pralines. If not, enable it.