9 Tools
- Analyze tables and detect data inconsistencies
- Compact and repair databases to improve performance .
9.1 About Tools
Access provides several tools to help manage and optimize your database. This chapter covers the following:
- Table analysis
- Compacting and repairing databases
Additional useful tools in Access include:
- Performance Analyzer
- Database Documenter
- Encrypt with Password
- Creating a Switchboard
9.2 Analyze Table
Goal: Detecting inconsistencies in tables.
When the same piece of information is stored in multiple places, it’s called redundancy. This is problematic because if that information changes, you must update it in every location. If you don’t, your database becomes inconsistent—meaning the same data exists in contradictory forms.
Access includes an Analyze Table wizard that helps detect redundancy and split a table into multiple related tables for more efficient data storage. This process is called normalization.
You can allow the wizard to decide how to split the data, or you can make those decisions manually. After splitting, the wizard can help you clean up the original data. At the end, you can choose to create a query that merges the normalized tables into a view that resembles the original.
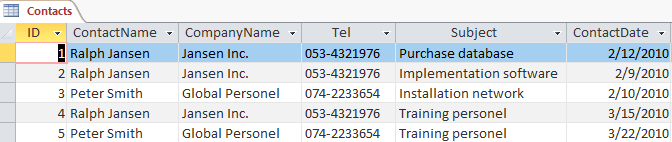
In Figure 9.1, you see an example of a table named Contacts with lots of duplicated data—this table is not normalized. Access can split it into multiple tables so that redundant data is minimized.
Task 9.1 Practice file: tools.accdb
Open the practice file.
Select the Contacts table.
Go to Database Tools > Analyze Table (group Analyze). The Table Analyzer wizard opens with an introduction explaining redundant data.
Click Next. The next screen provides information on how the wizard can resolve redundancy.
Click Next again. The wizard asks which table contains redundant data.
Select the Contacts table and click Next. Now you’ll choose whether you or the wizard will decide how to separate the data.
Select the option to make the decisions yourself, then click Next.
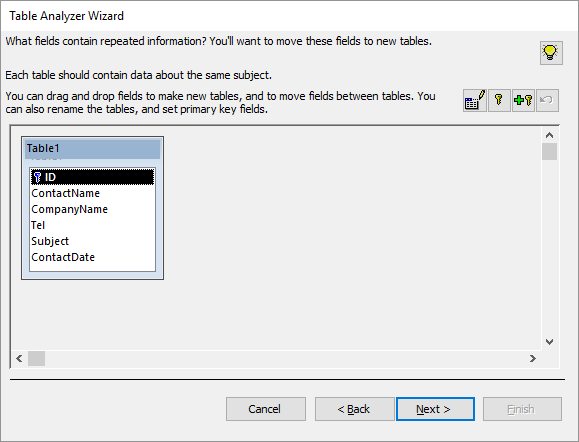
In this step, you can create new tables and assign fields to them.
Select the ContactName field and drag it outside the current table area. A new table is created containing that field. The wizard prompts you to name the new table.
Name the new table Contactpersons and click OK.
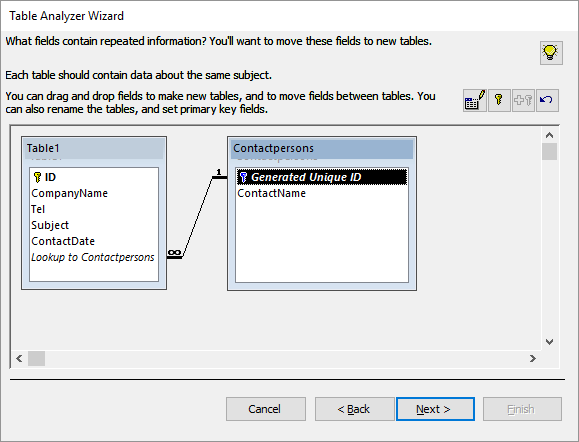
- A relationship is automatically created between the original and the new table.
- You can adjust the table positions and sizes by dragging them or their borders.
- Drag the fields CompanyName and Tel to the Contactpersons table.
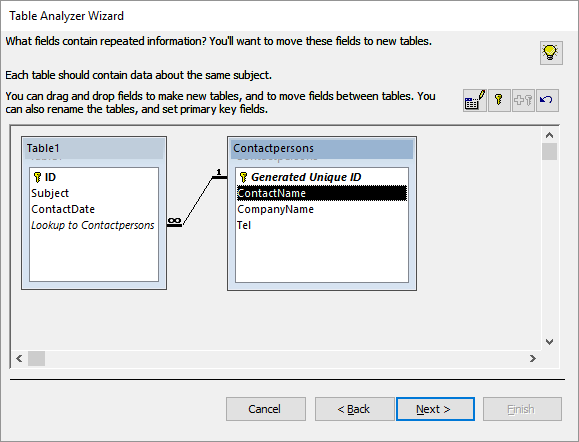
Click Next. The wizard asks if you want to create a query.
Choose not to create a query and click Finish. Now three tables exist:
- Contacts (original)
- Contactpersons (new)
- Tabel1 (new)
- Contacts (original)
You may see a warning message stating that the command TileHorizontally is unavailable. If so, click OK.
Close and save the tables.
Delete the original Contacts table.
Rename Tabel1 to Contacts.
9.3 Compact and Repair Databases
Goal: Defragmenting and repairing database files.
Over time, as you add, edit, and delete records, your database can become fragmented, resulting in slower performance. Deleting records or objects may leave behind unused space. Although Access attempts to repair issues when you open a database, it doesn’t always catch every problem. In such cases, you should manually run the Compact and Repair utility.
Compacting also affects AutoNumber fields. If records at the end of a table with an AutoNumber field are deleted, the next new record will continue numbering from the last used value.
To manually compact and repair a database, go to Database Tools > Compact and Repair Database (group Tools).